RADTrack™ Reporting
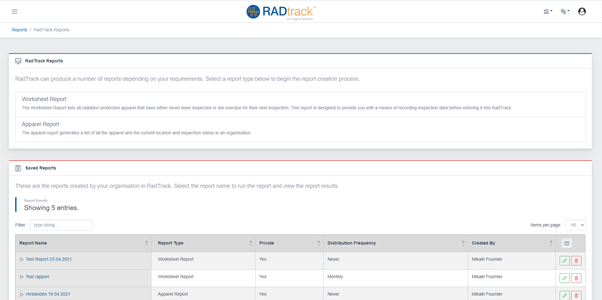
RadTrack has a very powerful, yet simple to use reporting engine which allows you to create customisable worksheets, apparel and inspection reports. Each report can be saved for easy reference at a later stage or even configured to have the report sent by email at fixed intervals. To enter the reports section of the website click on the Reports link found on the main navigation menu.
Creating a New Report
To create a new worksheet report:
- Click on the Reports link found on the main navigation bar or click on the View All link found under the user reports.
- Select the Worksheet item from the drop down box located directly above the User Reports section of the web page.
- Click on the Start Report button (see section 9.2 for further options).
Generating a Worksheet Report
The RadTrack worksheet report lists all radiation protection apparel that has either never been inspected or is overdue for its next inspection. This report is designed to provide you with a means of easily recording inspection data before entering it into RadTrack.
To generate a worksheet report:
- Select the site by clicking on the drop down list and choosing an option from the list of sites available. Alternatively leave this field blank to create an inspection worklist for all sites.
- Select the department by clicking on the drop down list and choosing an option from the list of departments available. Alternatively leave this field blank to create an inspection worklist for all departments.
- Select the output format of the inspection worksheet. PDF will output the report to a printer friendly PDF file. HTML will output the report directly to the browser.
- Click the Generate Report button to generate the worksheet report or alternatively click on the Save Report button to save this report for viewing at a later date.
Generating an Apparel Report
The RadTrack apparel report lists all radiation protection apparel currently inventoried by the RadTrack. database and cab used to manage apparel according to its location within a site or department.
To generate an apparel report:
- Select the site by clicking on the drop down list and choosing an option from the list of sites available. Leave this field blank to create a report based on all sites.
- Select the department by clicking on the drop down list and choosing an option from the list of departments available. Leave this field blank to create a report based on all departments.
- Select the apparel type by clicking on the drop down list and choosing an option from the list of apparel types available such as an apron, thyroid collar or accessory. Leave this field blank to create a report based on all apparel types managed by RadTrack.
- You can select a status to filter the report on such as Not Inspected, In-Service, Sent for Repair and / or Disposed. Leave this field blank to have RadTrack to create an apparel report based on all statuses.
- RadTrack allows you to customise the columns or fields available within the apparel report. Select the columns you would like to appear on the report. The RadID, Nickname and Status columns will be checked by default.
- You can further refine the apparel report by grouping together commonly available fields in RadTrack. This enables you to create a report break down by Status, Type, Site or Department.
- Select the output format of the inspection worksheet. PDF will output the report to a printer friendly PDF file. HTML will output the report directly to the browser.
- Click the Generate Report button to generate the worksheet report or alternatively click on the Save Report button to save this report for viewing at a later date.
Saving Reports
RadTrack can save reports as templates for reference at a later date. RadTrack can also email you with a new report based on your chosen frequency.
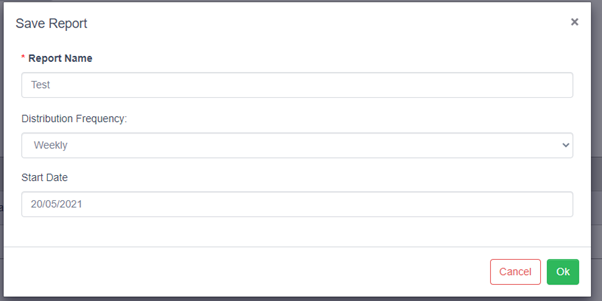
To save a report with RadTrack:
- Enter the name of the report used for easy identification within RadTrack.
- Enter the frequency in which you would like RadTrack to email this report to you. Options include weekly, fortnightly, monthly, bi-annually or annually. Select never (default) to disable emailing functionality.
- Select the starting date for RadTrack to start the emailing process. Ignore this field if you have selected the never option in the frequency field.
- Check the favourite checkbox if you would like this report to appear on your dashboard.
- Click on the Save Report button.