Introduction to RADTrack™ 2.0
Getting Around RadTrack 2.0
Commonly Used Icons
When using RadTrack 2.0 to view or manage tabular information you will come across a range of commonly used icons. Refer to the table below for a list of the icons used and their meanings:
| Icon | What it means |
|---|---|
| Click on this icon to edit or update an item. | |
| Click on this icon to delete or remove an item. |
Displaying Multiple Table Rows
The number of rows in a table displayed by RadTrack can be varied by clicking on the drop down box located at the top right hand side of the table. Click on the number of rows you would like returned to have RadTrack adjust the visible rows seen in the table.

Sorting Table Fields
RadTrack 2.0 allows you to sort on any fields visible in a tables header. To sort by a field name click on the column header. To interchange between ascending and descending click again.

Common Navigation Elements
The RadTrack website has four commonly used navigation elements which are referred to in this manual. They include:
The Navigation Menu – used to navigate the site and includes links to the most commonly used sections of the website.

Breadcrumbs – used to show you where you are within the RadTrack website. You can click on any of the links found in the breadcrumbs to traverse back through the website.

Logging into RadTrack
The Login Screen
RadTrack has been optimised to be accessible by any modern web browser. 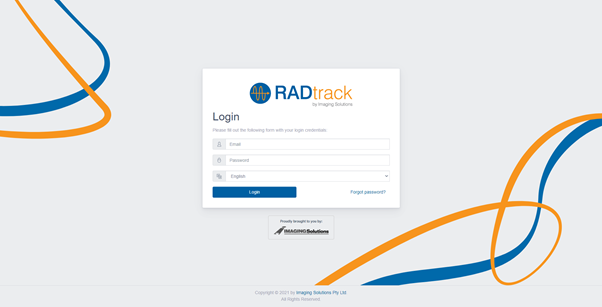
To login:
- Open https://v2.RadTrack.com.au/open in new window in your web browser. Most web browsers will have an address bar in which you can type in the RadTrack 2.0 address.
- When the RadTrack 2.0 web page has loaded, enter your Username and Password. If you don't have a username and password or if you have forgotten your details, please see your administrator or select the Forgot password? Link to reset your password. Don’t forget to select the language you wish to view the website in.
- Click Login.

The First Time You Login
When you first use RadTrack you will be promoted to configure some basic settings. This will allow you to adjust various localisation and user settings such as your timezone, date format and initials. To configure the basic settings:
- Enter your local Timezone. When a time is displayed in RadTrack it will be automatically adjusted to this timezone settings.
- Enter your local Date Format. The date format is used when displaying dates or requesting date input.
- Enter your Initials. This field is used to display your initials when performing an inspection or an acceptance test. Leave blank if more than one person uses this account to login to RadTrack.
- Enter your Contact Details. This can be any form of contact; email address, phone number, etc.
- Click Save Options to continue
The Dashboard
When you first login to RadTrack you will be presented with the dashboard which is a convenient way of presenting an overview of any recent orders and / or outstanding apparel requiring inspection. The dashboard also provides a quick link section to commonly used parts of the website, reports and any general administration tasks
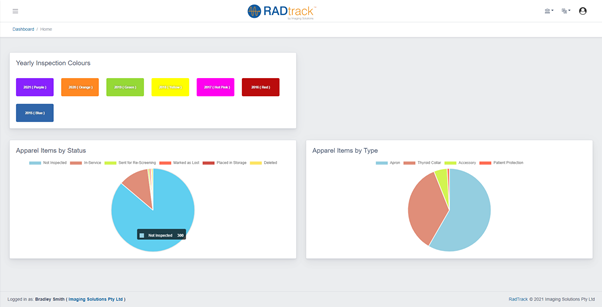
The dashboard has three main components to give you a quick overview of the status of all available RadTrack items to your user profile as well as the colour used to mark the year it was last inspected. As a user, you can view a quick overview of the number of RadTrack items that are in service or yet to be inspected.
The user is also able to view a broken of each type of RadTrack item in the right pie graph.