Apparel Management
Managing Apparel
Displaying RadTrack Inventoried Apparel
The manage apparel section of the website allows you to manage individual apparel owned by your department, site or enterprise. It gives you an easy-to-view tabular representation of all apparel currently managed by RadTrack.

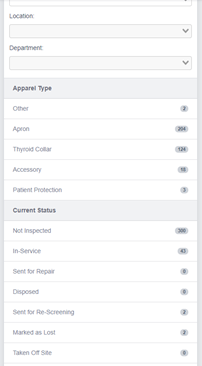
The manage apparel section allows you to sort and view information by:
- RadID The unique identifier used to track your apparel. Click on the RadID for more information about the apparel. Click on the RadID to view further information about the piece of apparel.
- Name A descriptive identifier created either by user input or automatically by RadTrack which allows you to easily identify the type of apparel.
- Apparel Type The type of apparel. E.g. Apron, accessory
- Current Status The current status state of a give apparel item. This field is used to determine if a piece of apparel has been inspected, not inspected, disposed, in-service or sent for repair.
- Organisation The organisation that the apparel is held.
- Location The hospital of medical institute the apparel is located at within an organisation
Searching Apparel
There is a quick search field above the list of apparel that you can be used to search by Name or the Asset Tag/RadID.

Alternatively, there is a filter that can be used to narrow down a search to just a given Apparel type or the Current Status. Within this Filter, you are also able to filter by organisation, location and department to narrow the search down to a single organisation if the user oversees more than a single organisation or wishes to only see apparel in a single medical institute.
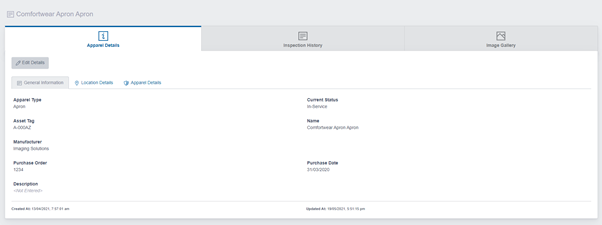
Viewing Apparel Details
You can view further details about a particular piece of apparel by either clicking on the RadID link found in the manage apparel section. This section will give you further information about the compliance and testing history of the apparel as well as the next recommended inspection date. It will also give you some basic information such as the type of apron, current status, site and department particulars etc.
Uploading a Photo of the Apparel
You can also upload a photo of the apparel which will replace the 3D rendered version. To upload your own photo click on the Upload Photo link found under tasks in the view apparel details of the website.
To upload a photo perform the following:
- Click on the Choose File button which will bring up your standard operating systems file chooser.
- Find the file you would like to upload keeping in mind that it needs to be a JPEG, GIF or PNG.
- Click on the Upload Photo button.
- RadTrack will now upload your photo to the website which will be visible every time you view the apparel.

Adding Apparel for RadTrack to Manage
The add apparel form found on the website allows you to add apparel for RadTrack to manage. Any apparel added through this form will then be visible through the manage apparel section. To add apparel click on the Create New link located under the operations menu found in the Manage Apparel section of the website.
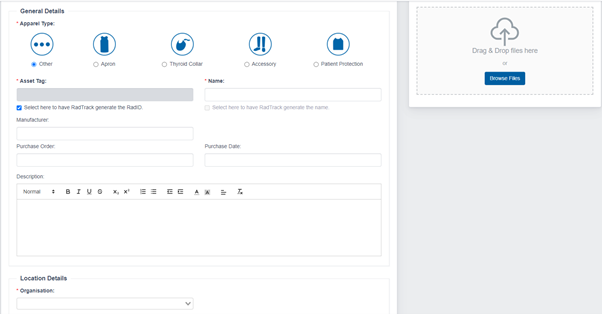
On the Add Apparel form to start off select the Apparel type, this helps RadTrack assist you when entering in all the other details of the apparel as some fields are only shown for selected apparel types. It is recommended to enter in as much detail as possible. The user has the option to let RadTrack to generate the RadID and the name by selecting the check boxes under each of two fields.
Apparel Brand Options
All apparel brands in RadTrack have specific options available which further define the Apparel for future ordering purposes. Depending on the type of Brand chosen when adding an apparel these options may change.
When a generic brand is chosen the following options are available:
- Type The type of Apparel such as a 1 piece or 2 piece (vest or skirt).
- Gender Male, Female or Unisex
- Outside Color The outside color of the apparel for identification purposes.
- Inside Color The inside color of the apparel for identification purposes.
- Lead Weight The lead weight protection of the Apparel.
- Embroidery Any embroidery included with the apparel for identification purposes.
Entering Inspection Findings into RadTrack
Inspection findings can be entered through the Inspections section of the website. This form works best with a RadTrack inspection worksheet which generate a list of apparel requiring inspection. See section 4 of this user manual for steps on how to create the inspection worksheet.
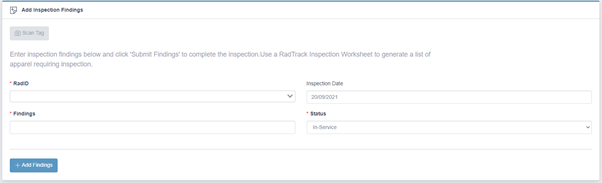
To record your inspection findings into RadTrack:
- Enter the item's RadID into the form.
- Enter the date it was inspected.
- Enter the findings or OK if there were no findings.
- Enter the next action required from the Action drop down list. The options include In-service, Sent for Repair, Dispose, Sent for Re-screening, Marked as lost, taken off site, Placed in Storage or Deleted.